Thursday 31 May 2012

As promised yesterday, here are a selection of Heidi's cards...

...and very nice they are too, here's a great card with a Nautical feel:
Seascape Stamp Set
made using our Seascape stamp set, love the blue gingham and kraft paper and here is what the set contains, together with the text 'Best Wishes' as you can see on Heidi's card :
Seascape
Next we have such a cutie made with our Henny Penny  Sunshine Sentiments & Buttons & Stitching stamps:
Henny Penny
The stitching & buttons you see on this card are all from the one set, with lots of variations and the best thing is you can make your buttons any colour you wish to match your project, stamp them onto kraft card as Heidi has done here or onto patterned paper, or plain white card then colour to match and don't forget a touch of Glossy Accents too!
Also from Heidi's class at the weekend is our lovely little Cutie Patootie 'Mary Splashing' - isn't she sweet?
Cutie Patootie - Mary Splashing
You can see that Heidi has used the buttons this time stamping on to the same base card & the cute little tag greeting is from our very popular Little Beauties, Tags stamps, this is a set of 12 assorted tag greetings,  finally, how about this:
Birdhouse Garland
Perfect in Pink - a twisted easel card with beautiful Gingham & Spotty papers showcasing our Birdhouse Garland stamp design (one of our all-time favourites).
So Heidi & Georgina did us proud at the weekend (thank you girls) and maybe given you a spot of inspiration too.

Tomorrow we have a new PROJECT be sure not to miss it - hasn't the week gone by quick? 
Little Claire x

Wednesday 30 May 2012

More cards from lovely customers....

What a great bunch of people we have as customers, here is another post today showcasing two cards from Anne & Pauline:
'Butterfly Tree' designed by Pauline
First off we have our Butterfly Tree sent in from Pauline, what a gorgeous tree, and next we have:
'Joie de vivre' designed by Anne Chilvers
 Joie de vivre sent in from Anne Chilvers, love the decoupaged daisies on the dress, thanks ladies for sharing your designs x
Now, here is a sample of cards made this weekend just gone when we where at Crawley & Kent; today we are showing a selection of Georgina's cards:
'Beach Huts'
A bright & colourful card made with our Beach Huts stamp set, here is what the full set contains:
Blissful
 Beautiful colours on this easel card made with our Blissful stamp and a very tasteful Wedding Card:
On Your Wedding Day
  designed using our On Your Wedding Day stamp set and here what this set contains:
Tomorrow we will show a selection of Heidi's class cards, so be sure to check in!
Best wishes, Little Claire x

Tuesday 29 May 2012

Another sunny day, can't believe it.....

...we have one more beautiful day here on the Wirral, wonderful!
A lovely lady called Donna has posted this card that she has made with the Little Claire Swirly Whirly Owls for us to share with you here on our blog:
This is a little card has been coloured with promarkers, Donna added glossy accents to their eyes which you can see a bit better in the close up below. 
If you would like to see more of Donna's cards visit her blog here  and there really are some beautiful cards too!
Tomorrow we will show you a selection of the gorgeous cards that Heidi & Georgina made at the weekend in Crawley & Kent.
Little Claire x 


Monday 28 May 2012

What a glorious weekend......

Very sunny, very hot and very busy for the Little Claire team!
This weekend we held our South East 'Little Claire' days and we were in Crawley on Saturday and then Kent on Sunday - and what a time we had!
Our lovely ladies made a super selection of cards which were designed by Georgina & Heidi and Steve & Heidie's hubby Dave were kept busy on the tea run!
hard at work in Crawley
We were also represented at the Sincerely Yours craft show in Taunton on Sunday 27th, Clive had a Little Claire stand at the show and hello to everyone who visited our stand, we hope you had a super time!
So, all in all, we had a busy 'Southern' crafting weekend.
Back in the North West today and we have started to send out our club stamps for June, so all club members - check out your letterboxes this week as your packs will be on their way (first batch posted this morning) and we have details of a new stamp set enclosed (not yet on our web) and a very special offer!
Talking of 'very special' one of our lovely customers recently emailed across pics of a batch of cards she had made using our Butterfly Tree stamp set, take a look at these:
 All cards featured here have been made with the one stamp set 'Butterfly Tree' and they have been designed by Linda Walker  thank you for taking the time to send these lovely cards in to us Linda x
Going back to the weather - has anyone got any washing left to go out on the line?  Is it just me or does this weather make you go looking around the house for ANYTHING to wash and put on the line?
Little Claire x  

Friday 25 May 2012

Weekly Blog Project...Loverly Jubblie Party Bag


Hello me lovelies
It's 
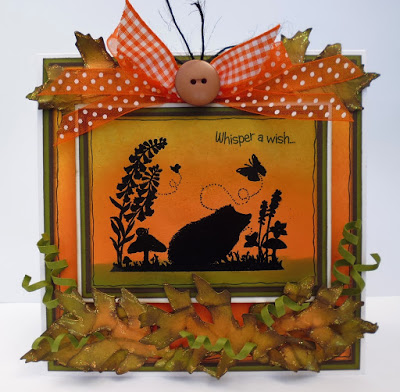
Gemma here with this weeks, Weekly Blog Project which I made a gorgeous party bag to share with you & I have a step by step tutorial of how to make it too. 
I have used one of Little Claire's gorgeous new Loverly Jubblies called 'Daisy Bunting'...isn't she just the sweetest!!
You will find her in Little Claire's shop here & you will find the rest of the Loverly Jubblies here.
This party bag is fantastic because it can be used for any occasion, you just adapt it to suit your needs.

Here is what you will need

Eazi score board
Border punch of your choice
A4 white card cut the width to 14.5cm (as if you was making a square card)
Scalloped coloured circle (using a large nestie)
Stamped image on plain white circle (using a large nestie)
Extra stamped image (to decoupage the other image)
14cm x 10cm Blue strip of card
13.5cm x 9.5cm red gingham backing paper
Promarkers...{skin} oatmeal, blush, ivory {hair} mustard, buttercup, vanilla, primrose {the rest of the image} azure, cyan, sky blue, ruby, poppy
Red gems
Red polka dot ribbon

To make this party bag
1) Using the strip of white card fold it in half & then butt up against the edge of score board, score down box line 1 & then flip over the card & score down the same line again.

2) Using your border punch, punch down one of the short edges of the card, now butt it up against the edge of your board & score down box line 2 as this will now be your flap of your party bag.

3) On the other shorter edge of your card butt up against your board & score down box line 2, now cut this part off.
4) Now fold your party bag, this is what your bag should look like...

Now onto adding all the pretty parts
1) Matt & layer your strip backing paper onto your strip of coloured card, now stick this down onto your party bag.

2) Colour both images with your promarkers..
Tip: When using your promarkers i use the darker colour first & then the lightest because i think it blends better, i do the same no matter how many colours i use.
Now matt & layer your plain white circle which has the stamped image on it, onto the blue scalloped circle.
3) From the extra image you need to cut out little Daisy & her balloon, now stick these down using foam pads onto the other image, this gives little Daisy & her a balloon a bit of a 3d effect.

4) Now stick the scalloped circle onto the flap of your party bag using red tacky tape because it's extra tacky. Now is the extra fun bit, it's time to embellish your party bag!!

Here's the finished party bag with a smaller one i made using the left over white strip from making the first one...

Righto me lovelies, i hope you all have enjoyed this little project & that i have inspired you to make some of these little party bags...i will keep my eyes open around blogland to see if any of you have made some!!

Before you go please check the post below to see if your one of our 7 lucky winners from the very fabulous giveaway for reaching 700+ followers :D
hugs and xxx


Thursday 24 May 2012

A Big THANK YOU....

To all the lovely people who posted kind comments on our '700' blog post - we have 7 winners - sorry we couldn't pick more:

Lisa  http://crafty-moments.blogspot.co.uk/
Lorraine:  http://lorrainebailey.blogspot.co.uk/
Margrit:  http://margritscraftroom.blogspot.co.uk/
Diane:  http://dianescarddesigns.blogspot.co.uk/
Susan:  http://craftinsuzie.blogspot.co.uk/
Anne-Marie:  http://little-applefalls.blogspot.co.uk/
Mary B:  http://maryscardworld.blogspot.co.uk/

Well done girls, please email: carol  quoting '700' and give her your name, address and 'Jubblie' choice.

designed by Gemma
designed by Gaynor
designed by Lyndsey
Thank you to everyone who commented, glad to see that our 'loverlies' are so loved!
Back tomorrow with a great new project,
Little Claire x

Wednesday 23 May 2012

Quick Cards made easy Issue 101 - Little Claire's column

Here is our column inside the latest edition of Quick Cards made easy, and this month we feature cards for Men, with a great card project designed by our Donna Donna's Blog  and a write-up by Steve letting you know what we've been up to lately!
 This issue of Quick Cards should be in the shops by tomorrow - make sure you grab your copy!
Thank you to everyone who has entered the competition for their favourite Jubblies, and for such kind comments too, we really appreciate it - and hello to our new followers.
Here are 3 new Jubblie cards from our DT Helen R: helen's blog 
Aren't they just GORGEOUS?  If you have made some 'loverly jubblie' cards please send them in and we will share the ideas.
Have a luverlie jubblie day - Little Claire x

Monday 21 May 2012

Not only have we reached 700 followers on our blog.....

But - we now have over 5000 friends on Facebook!

Yippee - hello to all of our friends, and to celebrate this huge milestone we are running a very special offer for ONE DAY ONLY -
20% discount from your order if you call us tomorrow (Tuesday 22 May) between 9am - 5pm - order anything you like, as much as you like and we will deduct 20%!
no further discount, does not include sales items 

T:0844 800 4376  - OR -  0151 342 5715 & the first 50 customers will receive a FREE 'handmade by' stamp
our King Robert & Queen Daisy, designed by Maxine (love the teapot!)
 So, give us a call and stock up on your stash!
Little Claire x

Sunday 20 May 2012

We have 700 followers!

Fantastic news; we now have 700 people following our blog!

As a thank you for your support we would like to offer a competiton where 7 lucky people can each win a 'Loverly Jubblie' of their choice - just leave us a comment to say which is your favourite 'Jubblie' see full range here and you could win it!
We will announce the 7 winners on Thursday 24 May - so plenty of time to pick your favourite Jubblie, and who knows, a brand new 'Loverly Jubblie' could be in your craft stash by the weekend - good luck x

'Umbrella' Jubblie
designed by Donna
'Travelling Daisy' Jubblie
designed by Georgina
There are four more 'Loverly Jubblies' plus lots & lots of card samples from our DT's here on our web.
So get commenting and get winning!
Little Claire x

Friday 18 May 2012

Weekly Blog Project - Butterfly Bling


 This week it's my turn (Helen N) to host the weekly blog project and I've got a clean and simple card for you with a bit of added bling!

Anyone who knows my stamping style will know that I make a lot of clean and simple cards and also that I'm not a big fan of glitter.  However, Little Claire sell an amazing product that has meant I can finally use glitter to achieve a great result without any mess!  Have a look here on the website at the Glitter Sparkle Sheets to see what I'm talking about.

And they're not just for Christmas!  They add a perfect touch of bling to both stamped and peel off images and can also be used to give sparkle to backing papers.  My card uses just a small amount of one sheet and is also a great way to use up that little tiny bit left of one of the sheets.

Here's what you'll need:


Little Claire 'Butterfly' stamp
black paper
blue card
Promarkers - Pastel Blue, Denim Blue and Caramel
white stamping card
white square card blank
black self adhesive gems

And this is what you need to do:

1. Stamp the 'Butterfly' image twice on to white card using the Memento ink pad:

2. Colour both images using the Promarkers.  You don't have to colour the base layer where it will be covered by the decoupaged parts but I think it looks neater if you do.  Also a tip to make your butterfly more defined - use the Denim Blue Promarker with a Ultrafine Nib to go round the inside edge of the wings.

3. Cut the base image to a panel measuring 10cm by 8cm and then layer on to black paper and blue cardAttach this to the base card:

4. Cut a small piece of the Glitter Sparkle Sheet, peel off the backing and lay it on your craft mat with the sticky side up.  Place your second butterfly on to the sheet (image side to the sticky part!) and then burnish.  I find this the easiest way to attach the Glitter Sparkle Sheet without any bubbles or wrinkles.  Next cut out the inside parts of the wings and then attach with foam pads over the base image:
 
5. Finish the card with some self adhesive gems:
Hope that's given you some ideas!  There are some more ideas on the website gallery for Glitter Sparkle Sheet including using it with the Little Claire printed acetate sheets, over stamped images and peel offs.

Have a great weekend
Helen N x

Thursday 17 May 2012

'Maybe' & 'Keep in Touch'

Here are three super cards made by our DT Lyndsey here that we know you will love to see:
 Lovely card mady with 'maybe' from our 'Loverly Jubblies' can you see how Lyndsey has added a blue sky behind little Robert and the sentiment is from our new 'Dictionary Definitions'
Here is 'Keep in touch' great layering with the patterned papers and again, can you see the cloudy sky background?
 And here is another super design made with 'Maybe' and another of our 'Dictionary Definitions' and our wonderful 'Bunting'  stamp set - gorgeous!
Thank you Lyndsey, super inspiration.
 Little Claire x