Monday 30 November 2015

Buy 5 Digi Images - Get 5 Images FREE!

Buy 5 Digi Images - Get 5 Images FREE!

Silhouette Lighthouse Digi - card designed by Lucy
Buy 5 Digi Images... 
Add to your basket and pay...
email: carol@littleclaire.co.uk with your choice of 5 more images FREE
We will mail 5 more digi images to you for FREE! - WOW, that's a great big offer from the team at Little Claire

Birdhouse Garland Digi - card designed by Lynsey
Check our full range of digi images here - offer ends 12pm Tuesday 01 December x

Little Claire

Friday 27 November 2015

Bees Knees Card

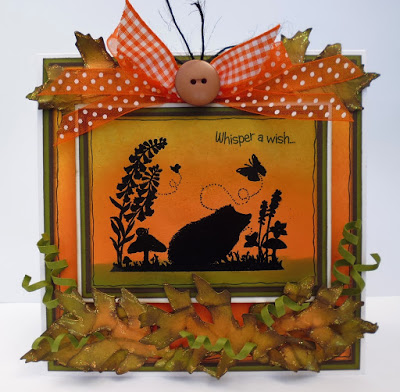
Hello Its Alli here with todays blog project and this is a card I have made using the Little Claire Bees Knees stamp set and apart from the cute little images I used paper scraps that I had in my stash box and a load of punches (I love using punches).
what you will need:
Little Claire Bees Knees stamp set
5 6/8" x 5 6/8" cream base card
craft card
cream card
good quality white card to stamp onto
Bird Song 8" x 8" paper pad - green leaves
black Versa Fine ink pad
Tim Holts Distress Ink - Vintage Photo
colouring in implements of your choice
1 1/2" circle punch (or die)
scissors
ring binder hole punch
various printed paper scraps
various punches (hearts, flowers, butterflies)
pearl gems
silver Sekura gelly roll pen
Cut a piece of craft card to mat and layer onto the cream base card and stick into place.
Cut a piece of the Bird Song green leaves paper to mat and layer onto the craft card which is already stuck onto the base card and stick into place.
Cut apiece of cream card 4 1/2" x 4 1/2".
Mat and layer the cream card onto craft card.
Using the 1 1/2" circle punch and your paper scraps punch out 6 circles.
Using the Little Claire Bees Knees stamp and the black Versa Fine ink pad stamp the images onto good quality white card.
Colour the images with colouring in implements of your choice.
Using scissors cut out the samped images.
Stick the circles and the stamped images onto the cream card square.
Stick the circles square onto the base card at a jaunty angle.
Using your stash of punches and your stash of paper scraps begin punching out shapes to stick onto the circles.
Arrange the shapes onto the circles until you are happy with how they look and then stick them into place (I gave definition to my shapes by folding the hearts and butterflies down the centre and rolling the centre of the flowers with a ball tool).
Paper piece the heart on the bee hive and the flower by stamping the images onto printed paper and then cutting around the desired part of the image and then stick the cut out printed paper onto the stamped image.
Draw a sparkly silver line down the centre of the butterflies and place pearl gems at the centre of the punched flowers.
Punch out 6 dots from your scrap paper using the ring binder punch and bevel the dots using a ball tool and a piece of foam.
Stick the dots onto the card (I use hot glue to stick the dots onto the card as it makes a solid bond with the card and fills in the void under the dot, but it is a messy job and you have to be quick and accurate).
Stamp the sentiment "You really are the Bees Knees!" onto craft card using the black Versa Fine ink pad.
Cut the sentiment out and shade the edges using Tim Holts Vintage Photo Distress Ink.
Stick the sentiment onto the card.

Thursday 26 November 2015

We 6 Cats - Gift Bag Stocking Filler - Thursday Digi-Stamp Blog Project

Good Morning Everyone! 


It's Sarah here with a new Digi-Stamp Project. I have used parts from the Digi-Stamp - We 6 Cats.

This is a very cute stamp and continuing my theme of dissecting the digi-stamp I have made these fun stocking filler gift bags - which could also be put on the tree!


I filled these with Lindt Lindor chocolates :)

Here is a list of materials and products I used for this project:


Smooth white Card Stock - to print on 
Blue, Red and shiny Green Card Stock
Lawn Fawn Die - Goodie Bag 
Large hole punch
Acetate
Ribbon and Twine
Scissors
Glue and Foam Pads

Firstly I cropped 3 of the Digi-Stamp cats (separately) in Photoshop Elements and erased the lines so I had 3 single cats. (Previous tutorial explaining this - here). 

My tutorial this time is to show how you can colour the Digi-stamp on the computer, so when you print it - you are ready to start creating. This is good if you have lots of the same thing to make and no time to colour each image individually. 

 
Select the paint bucket tool on the left (as picture above) and select the colour you want to use by clicking on the colour square and selecting a colour from the pallet (as picture below). Then click on the part of the digi-stamp you wish to colour and this will fill the whole area in - example above shows the Christmas hats in red.


Carry on doing this with various colours until the whole stamp is coloured in the way you want. This is also handy for trying out colour combinations, if it doesn't work you can just change the colour - rather than have to start your whole project again if colouring by hand. I settled on the colours below.
 

To make the gift bag I used the Lawn Fawn Goodie Bag die, which you need to cut out twice to make one complete bag. I cut out two in each of the colours - red, green and blue. I then punched out three circles, on one of the die cut card, in each colour. I then cut some acetate big enough to cover the circle and adhered this to the inside of the die cut to make a window. 


Then I used a bone folder to fold along the score lines and glued the tabs with wet glue to assemble. Using wet glue allows me to get the tabs in the correct place as wet blue allows some movement. I made each half first and then glued these two together. 
To finish I die cut some snowflakes and hand cut the cats out. I attached the cats with foam pads to the bag and glued the snowflakes on, adding clear gems to the centre of the snowflakes for a sparkly finish.


I finally filled the bags with the chocolates and then tied the top with ribbon and twine.

digi We 6 Cats

Thanks for stopping by to take a look, hope you enjoyed the gift bag project!


Sarah x


Tuesday 24 November 2015

SALE!


With only four weeks until Christmas (eek), we thought we would treat you to a Little Claire SALE so we're taking a WHOPPING 30% discount off all orders (subject to availability) from today until 10am on Thursday 26 November. Yes, all orders, online, telephone, email....just quote code GAP30 and you're away! Just as an example, one of our £6.00 stamps will only cost you £4.20, saving you £1.80! Or if you spend £20.00, then you'll save a massive £6.00!!! What are you waiting for? Hop over to our website here to grab yourself a bargain!

As an extra treat, we also have a little Christmas surprise present to give away. Simply tell us what you are looking forward to most this Christmas - in just four words. We will select two winners and announce them next Tuesday 1st December.
Now for the winners of last week's competition - we asked you who you would most like to dance with.  Lots of lovely answers thank you. The winner is Hazel Pepper who said...

'I would love to dance with Bruce Springsteen. He's a bit of a rubbish dancer, and so am I so it would be fun all round! Also as I am in a wheelchair most of the time, so to be able to stand up and dance with my hero for a minute or two would make all my dreams come true.'.

Well done Hazel, please contact Carol with your address details.

Have a lovely day and don't forget to order by Thursday 10am to get your 30% discount!

The Little Claire Team xxx

Friday 20 November 2015

A Summer's Day


Marianne here with today's project showing how to use one of the latest releases to create a pretty Summer scene.

You will need
6" white card blank
CC Designs Grass die
Small butterfly die or punch
Cheery Lynn faerie mushroom die
Copic markers
Black stamp pad
Black, green, brown, tan, purple and white card
Small white pearls

1 Stamp the flowers, bee, butterflies and sentiment onto white card as shown.
2 Colour with Copics. Cut card slightly smaller than card blank ensuring the grass is right at the bottom. Mount onto black card. Attach to card front.
3 Diecut 2 mushrooms from brown card and two from tan card. Attach either side of the stamped grass.
4  Diecut grass from green card and attach along the bottom of the card.
5  Punch or diecut four small butterflies from purple card and attach  as shown. Add small pearls to the bodies.

A clean and simple card utilising three of the stamps from this set.

Thursday 19 November 2015

Digi Stamp project: gift envelope

I made a gift envelope with Little Claire's cute digi Cat with Santa hat.

Materials:
- digi Cat with Santa hat
- sentiment digi Merry and Bright
- 2 design papers
- ribbon
- double sided foam tape
- paper distresser
- stapler
- wooden stars
- color medium
- Here's a link to Lisa's clear explanation about downloading and resizing digi's

Step by step:
1. Start with 2 design papers of 21 x 12,5 cm. On this photo you see the backside, so you can see the folding lines.
2. Score the paper with stars at 16 cm and the striped one at 14,5 cm.
3. Use the paper distresser for all edges.
4. Use a die cut to give shape to the end of the striped papers and make 2 holes.
5. Close to mark with a pencil the holes in the paper with stars.
6. Put a ribbon through these holes, adhere doublesided foam tape and close, so a tag can be added.
7. Make a tag from the striped paper (14,5 x 6 cm) and cut 2 corners, use the paper distresser and score at 12 cm.
8. Adhere with double sided foam tape and close.
9. Make a hole at the top and attach a ribbon through it and use a staple as extra detail.
10. Download and print the 'Merry and Bright' text (it had the right size, so there was no need for resizing).
11. Distress the edges and glue it on.
Here's the backside with a gift.
Here you can see the tag in the gift envelope.
12. Download the cute 'Cat with Santa hat' (this digi had the right size too).
13. Color with your own color medium (I colored with copics).
14. Fussy cut it.
15. Put double sided foam tape behind the image and glue it on the front side.
This is the backside of the gift envelope with my watermark and my QR barcode.
And here's the finished gift envelope when it is closed with a bow.
16. Decorate with some wooden stars.
Hope I have given you some inspiration.
xxx Margreet


Tuesday 17 November 2015

Here's something to dance about...

We've got a spring in our step today as we announce the start of a pre-Christmas SALE! To kick things off, we have a little treat for all 'Strictly' fans (us included) - our Silhouette Dancers stamp is now on offer for only £2.00, until Thursday or until stocks last. Shimmy on over to the website to grab hold of this great bargain while you can.

designed by Gaynor Bloor
If that doesn't send you into a spin, then how about the chance to win a little 'surprise' prize with this week's competition...Simply tell us who your favourite dance partner would be and why. Ours would be Gleb and Aljaz from Strictly of course - oh to be wearing a sparkly gown and swished around a dance floor by the pair of them is a Little Claire dream... (says Steve!).
Send us your comments and we'll pick and announce a winner next Tuesday 24 November.

Look out for more offers over the next few days!

The Little Claire Team xxx


Monday 16 November 2015

Christmas Door Wreath Card Blog Project

Good Morning!

It's Lucy here!
I'm the new Design Team Member and this is my first blog project for Little Claire, I hope you like it!

Today's Card is showcasing The Magic of Christmas Stamp Set and gorgeous Snowy Ombré Paper in a Door Wreath design!


Products Used:

The Magic of Christmas Stamp Set
Snowy Ombré Paper Pack
6x6 Card Blank
Tartan Ribbon
White Pearls
(All available at Little Claire's)

White Bleed Free Card
Woodware small grass punch
A4 Green Card
Drawing Compass
Pro markers


Instructions:

1. Take out the Red Snowy Ombré paper and trim the Green Cardstock slightly larger to create a nice border for the paper.
Stick together and stick to your Card Blank. Then stamp the sentiment in the bottom corner.


2. Stamp the door image onto White Bleed Free card.
Open the Compass 5.3cm, place the spike at the bottom centre of the wreath on the image and draw a circle.


3. Stamp the geese onto the leftover bleed free card.
Colour both images with Promarkers (or similar) and cut out.


4. Cut your ribbon to length and stick to the centre of your card blank.
Stick down the door image in the centre, 2cm from the top of the card.

5. Punch 20 shapes from the left over Green Cardstock using the Grass Punch.
Stick around the edge of the image, layering each one over the stalk of the one in front.


6. Tie a bow from the ribbon.
Snip arrows to the bow tails by cutting up the centre then from both corners up to the snip mark.

7. Stick down the bow and goose and add two 4mm Pearls to the top corner to finish.


I love how effective this Snowy Ombré Paper Pack is and there are some really gorgeous colours in it to! Hope you like my project!

Thanks for stopping by and have a lovely Monday!

Lucy x

Saturday 14 November 2015

Monthly Stamp Challenge # 63 - Christmas in White Theme

Hello and welcome to our November challenge.  We had lots of lovely entries in our October challenge, thank you to those of you who entered.

Our winner of the prize of goodies is :

Dora - Entry # 12


Well Done! Please contact Carol (carol@littleclaire.co.uk), who will send you your prize.

Our top three entries this week, who qualify for our Top Three Blinkie are :

(1) Carrie S - Entry # 11
(2) Stephanie - Entry # 1
(3) Lou - Entry # 26

Well done ladies, all of your cards were so beautiful!

Please feel free to take the blinkie from our side bar and add to your blogs.
 Our theme for November is : Christmas in White!

So the Design Team would like to see lots of white card, papers and embellishments on your Christmas entries.  You can use any stamp of choice, not just Little Claire stamp images.  Please see the challenge rules below, before you enter our challenge.

Our prize for this month :


It includes :

A selection of Little Claire Snowy papers
Little Claire 'Robin & Snowdrop' stamp set
One pack of Bling Stones
One pack of Pearl stones
One pack of White Adhesive Lace

We have a lovely new design team member joining our team this month.  She makes beautiful cards and we are so lucky to have her onboard.

Lucy Woods

Blog Address : http://littlelucyscards.blogspot.co.uk
Here is Lucy's blog where you can see all of her wonderful creations.

Welcome aboard Lucy!
 Here are all of the Design Team cards, using the 'Christmas in White' theme on their cards.
 Firstly,
  
Allison using the stamp sets
'Snowman Friends' and 'Dinky Sentiment - Merry Christmas'
  
 Diane using the stamp set
Gaynor using the
'Christmas Owl' Tree Topper
  
Lucy using the stamp set
Lynsey has used the stamp set
Marianne using the stamp set
'Three Sparkly Snowmen'
Susan has used the stamp set
'RWAV Winter Scene' and 'Santa's Hat' sentiment
  

Helen has used 'Christmas Lights'

 Here is a list of our rules, please read and follow before entering our challenge.

 Can we please ask that your card/creation is an original design of your own and not a copy or remake of another card. This is plagiarism and these entries WILL NOT be included.

(1) You DO NOT need to use a Little Claire stamp to qualify for the prize draw.
(2) You may enter the challenge UP TO 3 TIMES ONLY PLEASE and you may combine with other challenges.
(3) You MUST follow the challenge theme and NO BACKLINKING please, new cards only.
(4) Please provide a link to our blog in your post.
(5) Please leave a link (via link below) to your actual card, not just to your blog.
(6) Please turn off Word Verification on your blogs, it makes it so much easier & quicker to leave a comment on your blog.

The challenge finishes on Friday,  11th December 2015 @ 16.00pm and the new challenge (# 64) will be open on Saturday, 12th December 2015
We look forward to seeing all of your entries, good luck and get stamping!

The Little Claire Design Team

xxxxxx


Friday 13 November 2015

Friday Blog Project - A Circle Card ..........


Hi everyone, it's Lynsey here with a circle card tutorial for you for this week's Friday blog project. 

Materials:
White Linen Cardstock
White Smooth Cardstock
Versafine Onyx Black Ink Pad
Joanna Sheen Leaf Die
Tonic Circle Trellis Dies
Tonic Circle Dies
Paper Flowers 
Pearls 

1. Cut 2 circles using the largest of the scalloped circles from circle trellis die set.  Score a line one inch from the top of one of the die cut circles and attach using double sided tape to the other circle to form your card base. 

2. Die cut a piece of the floating dandelion paper into a circle and attach to the card base.

3. Die cut the middle sized trellis circle die out of white linen cardstock and attach to the centre of the card base.  

4. Stamp the dinkie dandelion stamp onto white cardstock and attach to the centre of the card base.

5. Die leaves from white cardstock and attach to the card base with the paper flowers and pearls to finish. 

Thanks for stopping by.
Lynsey x


Thursday 12 November 2015

Simple Christmas Card–Digi Stamp Project

Morning All! It’s Lisa here with a new ‘Digi Stamp Project' and today I’m showcasing the Folk Snowman 3 digi stamp:

    folksnowman3

I’m still in the middle of making my Christmas Cards and just because I’m mailing my cards and trying to keep them as flat as possible I still like to put a little time and effort into them.

You can’t get much flatter than this card as I have printed the image straight onto the card blank and then coloured it in:

Folk Snowman 3 (1)

Supplies:

Step by Step:

  1. Open up a blank document in Microsoft Word.
  2. Click on ‘Insert’ from the top menu and then click on ‘Pictures’clip_image002_thumb13
  3. Click on the older where you store your digital images and select the image you want to useclip_image004_thumb2
  4. Change the image to 8cm wide by clicking on the bottom corner of the image and dragging in or out to make bigger or smallerclip_image006_thumb2
  5. Centre the image at the top of the page by clicking on the image, then format on the top menu, then position and then ‘top and centre’image
  6. Turn the image upside down by clicking on the image, then format on the top menu, then rotate and then ‘Flip Vertical’ image
  7. Print the image onto plain white paper.Folk Snowman 3 (12)
  8. Using repositionable tape, stick the card blank into place over the image, place the paper back into the printer and reprint the image.Folk Snowman 3 (13)Folk Snowman 3 (14)
  9. Fold the card blank in half and colour the image with coloured pencils for a brighter look or if you want a softer look use alcohol pens.Folk Snowman 3 (15)
  10. The finished cardFolk Snowman 3 (4)

I hope you like my project and are inspired to try something similar. My blog is www.craftingbelle.blogspot.com if you would like to see some more projects.

Thanks for stopping by

Lisa