Thursday 30 June 2016

Wooden Owls - Thursday Blog Project by Sarah

Good Morning Everyone! 


It's Sarah here with a new LC Designs Project. Today I am sharing something a little bit different. I have used the fab paper pack - Quirky Quilts to decorate some wooden owl shapes - cut out for me by my lovely husband!


How cute are these right!?
Here is a list of materials and products I used for this project: 

LC Designs 6x6 Paper Pack - Quirky Quilts
Wooden Owl Shapes
White, Black and Orange Card stock
 Circle Dies
Triangle Punch (Xmas Tree Punch)
Glue and Sandpaper 

To make - I spread the glue over the whole side of the wood and then put the papers on, smoothing out any bubbles or creases. Once completly dried I trimmed down and sanded the edges to give them a shabby style finish. I then die cut the circles for the eyes and punched the triangle for the beak and glued these on too!

  Simple but really cute! Thanks for stopping by to take a look, hope you enjoyed the tutorial!


Sarah x

Wednesday 29 June 2016

June Challenge Inspiration from Helen


Good morning - it's Helen here to share my DT card for the current LC Designs Challenge and to remind you that there's still time to enter the challenge.

For this month's challenge we're asking you to 'create a scene' - so we're looking for cards featuring a scene of some sort.  You could use several stamps to create a scene or just use one stamp that shows a scene - the choice is yours!

All the details about the challenge are here on the original blog post and the prize on offer for the winner is:


For my card I've used 'Wavy Seascape'

It's folded card - here's a side view to show the shape better:


My card was designed for one of the LC Designs workshops I ran a couple of months ago - if you're interested in coming to one of my future workshops, have a look here on the website.


Tuesday 28 June 2016

Come and see us at The Brighton Craft and Hobby Show!

Come and meet Steve on the LC stand at the Brighton Craft and Hobby Show this Sat and Sun 02  and 03 July.
10am - 4pm
The Sports Centre, University of Sussex, Falmer, Brighton, BN1 9QU

Hope to see you there, LC xxx

Saturday 25 June 2016

Guest Designer Inspiration - June Challenge

Good morning everyone - it's Helen here to remind you that there's still time to enter our current LC Designs Blog Challenge.  

Our theme is 'create a scene' so we're looking for cards featuring a scene of some sort.  You could use several stamps to create a scene or just use one stamp that shows a scene - the choice is yours!

You can find the original blog post with all the details here.  Don't forget we have a great prize on offer for the winner:


This month we have two very talented Guest Designers joining us for the challenge.

First of all a card from Anne:


Anne has used 'Freedom' stamp set

and next a card from Ellenor:


Ellenor has used 'Dinkies Tulip Bunny'
 
I hope I've inspired you to take a look at our challenge and link up a card - we'd love to see you there!
 
Helen x


Thursday 23 June 2016

23 June - 23 items HALF PRICE!!!

It's lovely and sunny here on the Wirral today, 23 June, but we know that tomorrow is going to rain, so to spread a little joy Steve has chosed 23 items and reduced them to HALF PRICE until 10am tomorrow.
Find them all in the SALE section of our web here and this is limited stock so 'first come, first served' - hurry, we have stamps, paper packs, stamp sets and irresistible images, ALL HALF PRICE WOW xxx

Wavy Elephants - Card Project

Morning All!
 
It’s Lisa here with a new project and today I’m showcasing one of the newest Wavy Stamp Sets. Here I’ve used Wavy Elephants:
 
A new stamp set - Wavy Elephants
 
Today I’m using one of my favourite colour combinations, pink and grey, and I thought it went well with the cute little elephants.
 
Wavy Elephants (1)
 
Supplies:
  • Wavy Elephants Stamp Set
  • Memento ‘Tuxedo Black’
  • White Stamping Card, Pink Card and Grey Card
  • 15cm Square White Card Blank
  • Alcohol Pens
  • Patterned Paper
  • Die Cutting Machine
  • Shaped Nesting Dies and Corner Bow Die
  • Border Punch
  • Flower Punches, Pearls and Liquid Pearls

Step by Step:

  1. Cut a 13.5cm square of patterned paper. Mat first onto grey card and then onto pink card. Fix to the card blank.
  2. Cut a 14cm by 4cm strip of grey card and use a border punch to decorate the edge. Add a 14cm by 1cm strip of pink card on top and fix to right of the card blank.
  3. Using black ink stamp your Wavy Elephants image onto white stamping card, die cut into a fancy shape and colour in with alcohol markers. Mat first onto pink card and then onto grey card. Fix to the card base with foam pads.
  4. Using black ink stamp one of the sentiments from the Wavy Elephants stamp set onto white stamping card, die cut into a fancy shape. Mat onto pink card and fix to the card base with foam pads.
  5. Decorate the card with punched flowers, a die cut corner bow and pearls.


A quick close up of the fabulous stamp:

Wavy Elephants (2)

I hope you like my project and are inspired to try something similar. My blog is www.craftingbelle.blogspot.com if you would like to see more of my projects.

Thanks for stopping by

Wednesday 22 June 2016

Monthly Challenge Inspiration–Lisa

Morning All! It’s Lisa here with a quick reminder of our current monthly challenge and a closer look at my challenge project.

The theme of our current challenge is ‘Create a Scene’ and you can find all the details on the challenge post, here on the blog. We would love to see your cards entered in the challenge and there's a fabulous prize on offer for the winner!

For my challenge project I’ve used Dinkies Snowman and Pretty Pastel Dots Paper Pack:

Dinkies Snowman stamp
 
Here is my card:
 
Snowman (4)
 
I created my scene using an embossed and inked background, with two stamped snowmen coloured in, fussy cut and fixed to the background with foam pads.

Details of supplies can be found on my blog here.

I hope you like my project and are inspired to try something similar. My blog is www.craftingbelle.blogspot.com if you would like to see some more projects.

Thanks for stopping by and pop back tomorrow as I’ll be back with a new project.

Lisa

Saturday 18 June 2016

Happy Jumping Wavy Sheep


Hello everyone its Alli here with this card which I have made to hopefully inspire you to take part in the LC Designs June stamp challenge (click on the link for full T&Cs). I have had this stamp for a while now and when I first got it I had a field full of sheep to look out on from my crafty lair but before I could make anything the sheep were moved (apparently its a Strawberry field and the sheep are put in there to turn the ground over). So the stamp fell to the bottom of my stash and I only found it again the other day and it made me smile just as it had the first time I saw it.
 
These are the prizes you could win if you do decide to take part in the challenge, aren't they fabulous and as you would expect with LC Designs the quality of their products is second to none.


what you will need:
Diesire by Crafters Companion Create A Card - Rosie
Crafters Companion Signature Collection - Floral Delight
small stamen die/punch
die cutting machine
Fern/leaf die/punch
Tonic small Daisy boot punch
small hole punch
Versa Fine ink pad
white card to stamp onto
thick black card
copy paper
orange paper scraps
green card scraps
8mm peach satin ribbon bow

Fold the black card in two and position the 2nd largest Diesire Rosie die on the card making sure to line the non cutting edge of the die with the fold in the card, run the card through the die cutting machine to make a black base card.
 
Using the Wavy Sheep stamp and the Versa Fine ink pad stamp the image onto white card.
Place the stamped image within the 3rd largest Diesire Rosie die and roughly cut around the outside of the die with a pair of scissors (you are simply cutting the image down to a more manageable size so you don't have to be precise when you cut).
Colour the stamped image and colour the grass below the wavy line with a pale green.
*Tear the copy paper, place the torn edge on the grass part of the image and cut the paper down to size. Colour the paper with a slightly darker green. Stick the coloured copy paper onto the image.*
Repeat from * to * once more.
(I used wet glue to stick the copy paper to the image but when it dries it curls the image so if you can find a better way to stick the copy paper to the image I would suggest you do it and please let me know if you do find a better way to stick the copy papers)
If you have used wet glue allow the image to dry. 
Place the 3rd largest Diesire Rosie die on the card and run it through the die cutting machine, cut along the image where the die has not cut the line.
Using the Enjoy your Birthday stamp and the Versa Fine ink stamp the sentiment onto the topper.
Stick the topper onto the base card.
 
Using the green card and the leaf die cut out 2 x leaf shapes.
Chop the shapes about until the desired effect is achieved and stick into position.
Using the Floral Delight 3rd largest flower die cut a flower from the orange paper scraps.
Stick the flower to the base card.
Using the stamen die make a stamen from white card and stick onto the middle of the flower.
Using the Tonic boot punch cut 5 x Daisies from the orange paper scraps. Punch 5 x small dots from the white card and stick the dots to the centre of the small Daisies, stick the Daisies onto the card.
Stick the bow onto the card.
 

Wednesday 15 June 2016

June Challenge Inspiration from Sarah

Good Morning to you All!

For the Team Challenge Create a Scene, I bring you inspiration using the lovely Wavy Elephants Stamp Set and the Paper Pack Falling Daisies. There are some fab wavy stamps which you can find here


To create my scene I played around with papers and die cut shapes to compliment the stamp. I used Pro-markers to colour the elephants and flowers - Distress Inks for the background. I love the cuteness of this stamp and the sentiments are fab!

The Wavy Elephants, Wavy Hedgehogs and Wavy Doggies are £6.00 each set - but you can ... Buy all 3 for £12.00 (get one set FREE!) The offer can be found here!

The prize for this challenge is:


Defo worth entering! Details can be found here.

Thanks for looking,

Saturday 11 June 2016

Monthly Challenge 70 - Create a Scene

Good morning and welcome to our new challenge!

First of all, a big thank to everyone who entered last month's challenge, scroll down to see if you were our winner or one of the top 3.

Just before our new challenge, we'd like to say 'goodbye' to three members of the Design Team - Diane, Heidi and Susan.  A big thank you to you all for your hard work and fantastic creations - you will be very much missed.

Now on to this month's challenge and our theme is:

CREATE A SCENE

..... so we're looking for cards featuring a scene of some sort.  You could use several stamps to create a scene or just use one stamp that shows a scene - the choice is yours!

You can make anything that you'd like to - cards, ATCs, scrapbook layouts, tags and whatever else you can think of!   You can use any products that you want to although we would love to see you feature something from the LC Designs website.  Don't forget that we sell stamps, digi stamps, toppers, outline stickers as well as all the other goodies you need to make cards.  

Take a look here at our website to see all the gorgeous LC Designs products.

(click on the picture to go to the website)

And the prize on offer for this months's lucky random winner is:


Included in the prize is one of the brand new 'At the Seaside' paper packs!

****************
This month we have two guest designers joining us so please give a warm welcome to:


"My name is Ellenor and I live in Sweden (Vasteras) together with my boyfriend Stefan and my fluffy cat Knutte.

I have been crafting for about four years now and have mostly been creating cards. I love to try new things out but somehow I always go back into cardmaking.

We moved to a house a few yeas ago and I was lucky enough to get my own craftroom. I love to spend my free time in there, as does my cat :)"

You can visit Ellenor's blog here: http://missellenor.blogspot.co.uk/

and here is Ellenor's beautiful card:


Ellenor has used 'Dinkies Tulip Bunny'

and next, please welcome:


"Hello I’m Anne and I live in West Yorkshire with my husband. I have always enjoyed some form of craft but paper crafting has been the main focus for my craft for the last 20 years and I enjoy both card making and scrapbooking.
I was a member of the Little Claire Designs club for many years and always visit the stand at shows so was delighted to be asked to be a guest designer this month as I have always liked their stamps."
You can visit Anne's blog here: http://paperandink-anne.blogspot.co.uk/

and here is Anne's beautiful card:


Anne has used 'Freedom' stamp set

**********
And now here's some inspiration from our talented Design Team:


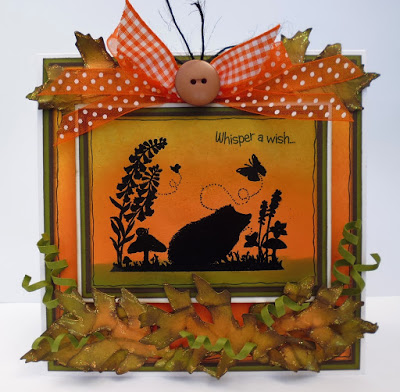
Sarah has used 'Wavy Elephants'


**********
Our Rules

1. Although we'd love to see you using our products, you can use any products that you want to make your project.

2. Only 3 entries from each person please - you can combine your entry with as many other challenges as you want to.

3. Please follow our challenge theme and no backlinking.

4. Please link up to and mention our challenge and please ensure you enter a link to your card and not just to your blog.

This challenge finishes on Wednesday 6 July  and our new challenge will start at 9am on Saturday 9 July

So now it's over to you ....................


Challenge 69 - Winners and Top 3

A big thank to everyone who entered last month's 'Butterflies'  challenge - we had lots and lots of wonderful entries!

Our lucky winner, picked at random is:

Entry number: 40 - Katrina


Congratulations!  Please e-mail Gill (info@mylcdesigns.co.uk) to claim your prize and don't forget to take your badge from the sidebar.

And our Design Team ladies have picked our Top 3 (in order of entry):

Entry number 8 - Katrina (it's your lucky day!)


Entry number 13 - Kath


Entry number 21 - Tracey B

  
Well done to all of you - don't forget to take your badge from the sidebar.

Make sure you check back shortly for our new challenge!

Helen and the LC Designs Team x

Friday 10 June 2016

Just to remind you...

...that Steve will be at The Mountbatten Leisure Centre, Portsmouth at the papercrafts show this Sunday 12 June from 10am - 3pm, we hope to see you there.

Here are two new cards showing off our Wavy stamps, first of all we have Wavy Sheep:

and Wavy Elephants:

Two gorgeous cards here, we are sure you will agree and we are continuing our love affair with our wavys with 3 new Christmas designs coming soon and 3 more general designs too.

Here's a card made with our new 'At the Seaside' papers and our Wavy Seascape stamps - fabulous!

Wishing you all a great weekend

LC Team x


Thursday 9 June 2016

Little Claire Designs - Little Robin Blog Project


Morning all,
I hope my posting finds you all well.  Today's blog project is using the new Robin and Text from Little Claire Designs alongside some of their delicious Dinkie papers.
So on with "the make:"


Ingredients:

Robin Set from Little Claire Designs

144 x 144mm blank card

Little Claire Dinkie papers – I chose a red pallet to tie in with the robin image.

Grey backing card

2 tiny tags

Assorted punches

Glossy Accents

Adhesive pearls and crystals

Mementos black ink pad

Pro Markers:  Black fineliner, Poppy, Firewood, Caramel, Sandstone, Pumpkin, Icicle and Tan


3D foam pads and double sided tape

Method:

Stamp images as shown onto white stamping card and tiny tags. Shade using chosen promarkers.

Cut LC dinkie papers in half and matt onto coordinating matting card.  Dinkie papers are cut 8cm x 4cm and matting layer 8.5cm x 4.5cm.

Square in the centre is 4cm x 4xm matted onto 4.5cm x 4.5cm.

Using various punches – punch from residual paper.


Position on card blank and fix using double sided tape.

Fussy cut out the robin image and fix using 3D foam pads.  Add tag sentiment.

Position punched shape and fix using 3D foam.

Add pearls and crystals to accent and glossy accents to robin’s chest if desired.
I do think he is a little cutie - hope I have shared a little inspiration this morning.  Cheerio for now. xxGaynor


Friday 3 June 2016

We have them! They are in stock...

...hi everyone, our lovely new 'At the Seaside' paper packs are in stock right now, so if you have placed your order it will be posted today.

These new packs come in two sizes; Large 6 x 6in £4.99 and Dinkie 8 x 8cm £2.99 and are full of lovely fresh pastel colours and designs including beach huts, deckchairs, bunting...

Using our white Tag cards and Dinkie Beach Hut stamp we made this with the papers from the pack:

and we made this card with our Beach Huts stamp set and papers from the large pack:

It seems ages since we ran a competition, so here goes - leave a comment telling us what you like best about the British Seaside and we will pick 2 lucky winners to each win a Dinkie pack of these new papers.
Good luck, winners will be announced on Monday 06 June x


Thursday 2 June 2016

Cutie !!


Morning guys...its my turn for a LC Designs project and I've used a little cutie from the Irresistible Images Puppy Portraits pack. You'll find loads of other puppy breeds in the pack !!  You can see why I chose this one......


This is my old Jack Russel boy Hugo who's brown now is rather white !!


Just used one of the 6" x6" dotty papers onto a white card base adding a bobble trim all round the edge. Then onto a 5 1/2" square of white card attached rows of  punched scallop dotty strips in different colours. Out of the middle of this, cut a square the same size as image. Mount onto front of card using 3d foam tape. Stamp sentiment onto image front and draw wavy black line round edge and glue into the aperture. To finish,  add a big dotty bow with bobble trim them heart button and add 3 smaller heart buttons to corners.

hugs Diane xx

Wednesday 1 June 2016

Ssshhhh!... Only for our special customers...

Enter this code: 01junesale at checkout - from NOW until 9.30 tonight (21.30) - and you will receive

30% discount from all your purchases!


Go, now...it's only on until 9.30pm

Blogger Inspiration Posting #69 Butterflies

Hi everyone,
My turn to share a little inspiration post today:
Our current Little Claire Challenge is anything that includes butterflies.  Easy peasy choice for me - I just couldn't resist using the cute cat, flowers and butterfly stamp set from LCD - I have used Dinkies Butterfly Cat and sentiment from the Butterfly Cat Set when previously launched.


There is a fabulous prize on offer:


All details can be found on Little Claire's Blog


xxGaynor LCDT